


1 min read
Tips for Choosing the Best Motor Oil for Your Classic Car
Over the past decade, owners of classic cars have watched as ethanol has infiltrared the nation’s gasoline supply. Ethanol is an alcohol added to...
8 min read

Oil leaks can be frustrating because they don’t come from one place on your car, and that can make them difficult to pinpoint and resolve. Engine oil leaks are the most common type, and we will deal with those in this article – the ins and outs of diagnosing and fixing these oil leaks in many types of cars, including classic cars.
 Some of these fixes can get quite detailed. Luckily, you have Bell Performance’s master mechanic, James Dunst, to give you some guidance. Following is what he has to say about how to diagnose and fix oil leaks that inevitably happen in classic cars.
Oil leaks can be a fire hazard if the oil is dripping on a hot exhaust manifold, and can cause drivability issues on newer cars if the leak is in the area of the oxygen sensors. There are liquid sealer products on the market that claim to stop oil leaks but in most cases they do not.
First, some basic advice that applies whether you’re talking about a newer car or a classic car.
When searching for oil leaks, common sense says you repair the highest leak first because the oil will run down and cover everything below the leak. After repairing the upper leak, clean the engine with a product like Gunk engine cleaner. Drive the vehicle for a few days and check to see if you have any additional leaks below the one previously repaired. Repeat the process until you’re confident you’ve gotten all of them.
Sometimes locating engine oil leaks can be a challenge. If you’re having trouble finding out where the leak is, there are some products on the market that can be added to the oil, that show up at the area of leakage when you use a black light.
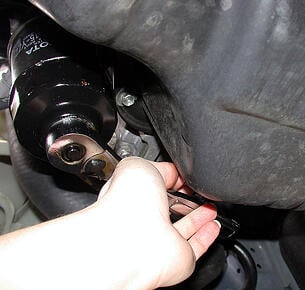
There are certain areas of the engine where you are most likely to find oil leaks – valve covers, oil pressure sending units, oil filters, drain plugs and areas like the rear engine seal.
Valve covers are a very common place engine oil leaks are found. Here’s how you fix those.
First, remove the valve covers. Make sure you thoroughly clean the gasket surfaces on the valve covers and the cylinder head by using an appropriate liquid cleaner so you have an oil-free, dry surface. Older classic cars have steel valve covers, and many times you will find the area around the bolt holes is distorted. This distortion will be a problem if not corrected, because it may keep you from being able to have an even amount pressure at all points attempting to make a proper seal as you replace the gaskets.
Place the cover on a solid metal surface and, using a small hammer, flatten the area around the bolt hole. Cork gaskets should be coated with a gasket compound like copper coat or High Tack and allowed to get tacky. This will hold the gasket in place when reinstalling the valve cover. If you are using a neoprene gasket do not use grease or any compound on the gasket that is slippery because this can cause the gasket to ooze out when tightening the cover. If it is neoprene just leave the side against the cylinder head dry.
A final note of caution as you finish the job. Be very careful not to over tighten the bolts on the covers so you do not split the cork gasket or distort the area around the bolt holes.
Other common areas where you can experience oil leaks are oil pressure sending units and oil filters.
Oil pressure sending units are surprisingly common sources of oil leaks. Luckily, it is easy to replace these units. All that is needed is to thread into an oil passage on the side of the engine block.
Oil filters are another area where oil leaks are often found. On the older classic cars that use canister type oil filters, it is important to completely remove the rubber seal where the filter canister fits into the seal groove. These rubber seals get brittle and it is common for pieces to break off and stay in the seal groove. If this happens and you do not remove it, the new seal will leak when the filter canister is re-installed. Spin-on cartridge filters can also have this problem when the rubber gasket sticks to the engine block and a new filter is installed with one gasket over the other, causing a major leak.
Another area that is a problem is the oil drain plugs. After multiple oil changes the threads in the oil pan can strip out. To solve this, oversize self-tapping oil drain plugs are available to replace the original. When installing, it is extremely important that you keep the plug as straight as possible. Failure to do this can result in the new one leaking because the oil drain plug gaskets are usually hard; unless it is installed straight, they will leak.
Next, consider important seal areas like the front crankshaft and the rear engine seal.
The front crankshaft oil seal can be a big problem area. These seals are made of a neoprene material, and when they age, they will harden or crack, causing an oil leak. Most of these seals can be replaced by removing the harmonic balancer but you will need a harmonic balancer puller in order to remove it (and many people, including classic car owners, may not have that).
As you seek to replace this seal, do a visual inspection of the area where the seal rides on the balancer. If there is a groove in the seal area, you’ll need to purchase a repair sleeve kit which slides over the end of the balancer, giving you a smooth area for the seal to ride on. It’s important not to skip this step. If you do not repair this area, a new seal may not stop the leak. The seal can be easily pried out of the front cover with a large screw driver. As you install the new seal, coat the neoprene lip with grease, and make sure you tap it with a small hammer evenly until it is seated in the cover.
Also a common leak area is the rear main engine seal. There are three different types of seals used in this area, including a one-piece neoprene, a two-piece neoprene, and a rope type seal.
If you have a one-piece seal you will have to remove the transmission and flywheel to get at it (which can be a bear). Drill two small holes in the metal opposite of each other on the seal. Insert a self-tapping screw in each hole, which will give you something to pry on to remove it. After prying the old seal out, put some grease on the neoprene lip of the new seal. With a small hammer, tap it in several places to evenly install the seal.
If you have a two-piece neoprene or rope type seal, you will need to remove the oil pan to have access to the seal. After removing the oil pan, remove the rear main bearing cap. You can use a round drift punch and a small hammer to remove the upper portion of the seal. Tap on one edge of the seal and drive it up. When an inch or two protrudes from the other side, use a pair of pliers to grab the protruding seal and pull it out the rest of the way.
Next, when installing the new upper seal, put a small amount of grease on the seal and push the seal up into position, making sure you have the angled edge of the seal pointing inward. Install the lower half of the seal which you also want to coat with a small amount of grease, again making sure the angled part of the seal is facing inward.
The recommendation is always to replace the rear main bearing, both upper and lower. If the main bearing is worn, it will allow an up and down motion of the crankshaft. You don’t want this this - you want the crankshaft to turn perfectly true with no up and down motion which will allow the seal to do its job.
In order to remove the upper portion of the bearing, there is a small kit with pins that fit in the oil hole of the crankshaft. Rotating the crank shaft with a breaker bar from the front of the Harmonic Balancer will push the bearing around so you can remove it. But make sure you rotate it in the right direction because there is a notch in the block that keeps the bearing in place. Rotate it so the notched side comes out first. Next, oil the new bearing and push it up in place making sure you install it so the indentation in the edge of the block lines up with the matching piece on the bearing. If you put it in backwards you will not be able to push it in place. When replacing the rear main bearing cap, be sure to torque it to specs found in a repair manual.
Once this is done, your job is not finished. You need to tend to the oil pan gasket.
Clean the oil pan gasket surfaces and use a solvent to remove any oil so you have a clean dry surface. If the area around the bolt holes is distorted from over tightening (as mentioned earlier), place the edge of the pan on a vice or metal surface and use a hammer to flatten those areas so that when you reinstall the pan, even pressure will be applied to the new gasket.
The new oil pan gasket set usually has four pieces. Use a product like Copper Coat or High Tack to coat the edge of the block and the top side of the oil pan gasket. Allow it to get tacky and put the gasket in place on the block. These products work like contact cement so the gasket will stay in place. Also coat the top side of the oil pan edge with one of these products and allow it to get tacky, but do not put this product in the area of the oil pan that touches the front and rear neoprene gasket seal. The front and rear gaskets are usually neoprene and they will need to be held in place while installing the oil pan. You can use some No#2 Permatex to hold these two pieces in place. After putting these two neoprene gaskets in place, dab a small amount of Permatex in the four corners where the pan gasket meets the neoprene gasket. Leave the bottom side of the neoprene gasket dry so it does not ooze out when tightening the oil pan. Be sure not to over tighten the oil pan bolts because this will split the gasket, causing an oil leak or distort the area around the bolt holes.
Remember we mentioned the third kind of seal you might have, a rope-type seal. If you have one of these, you will need a special kit for removing the old seal and installing the new one. There is a tool in the kit with an end like a screw that you turn up into the rope seal on the top to pull it out. The kit also has a cable with a Chinese finger on the end. A Chinese finger gets tighter when you pull on it. Put one edge of the new rope seal into the Chinese finger and pull on it to tighten it onto the rope seal. Oil the seal very well and insert the cable up in the area where the seal goes, feeding it around until the cable protrudes on the other side. There is a handle in the kit that attaches to the cable. You are now ready to pull the new seal in place. Pulling it in place works better when someone is rotating the crankshaft as described above. Turn the crank shaft in the same direction that you are pulling the seal. When the seal is in place, use a razor blade and cut the rope seal so that it is flush with the block. When installing the lower half of the seal, take a piece of round metal or wood stock like a dowel. Press the seal in place with the dowel starting from the center, working out to the outer edge of the bearing cap.
After this is done, use the razor blade to cut it flush with the top of the cap. Replace the upper and lower main bearing as described above and reinstall the cap and torque it to specs. You are now ready to reinstall the oil pan as described above.
If you are unlucky, you may have one of those engines that have a pin in the top of the grove holding the rear rope seal in place. You will not be able to replace the rope seal as we just described. You can however shim the upper seal to put downward pressure on the original rope seal. There is a kit that allows you to do this and it can be purchased at most auto supply stores. It contains steel rods that can be driven up on the back side of the seal and will slide past the pin taking the rounded shape of the seal grove. Drive one shim on each side with the special tool provided in the kit. Replace the lower seal as previously described along with the upper and lower bearings torqueing the bearing cap to specs.
All of these fixes require a modicum of mechanical skill. Many people who own classic and older cars may find this useful to keep their classic vehicles on the road. We hope you’re one of them.

1 min read
Over the past decade, owners of classic cars have watched as ethanol has infiltrared the nation’s gasoline supply. Ethanol is an alcohol added to...

1 min read
Last month James Dunst, Bell’s resident master mechanic, was the featured guest on The Classic Car Show podcast.
1 min read
People who have classic cars go out of their way to baby them, to take care of them. It’s not just because they have a bunch of money invested in...